Managing inventory can be overwhelming, especially when you’re juggling product details, stock levels, warehouses, and accounting implications. Wafeq makes this process surprisingly smooth by combining powerful inventory features with an intuitive, sheet-style interface that’s easy to use from day one.
From first setup to daily operations, this guide will show you exactly how to manage inventory in Wafeq with clarity and control.
Add a new item
To add a new item, click on “Products & Services” from the main menu, then select “Items”, and finally click on the “Add” button.
When adding an item, you’ll find “Basic information” that is required and includes essential details such as:
- Status: Selecting “Active” means the product is available for use in transactions. Choose “Disabled” if the product is no longer sold or offered.
- Product Name: Choose a clear and descriptive name to identify the product or service in your system and documents.
- Inventory Tracking: Enable this option “Tracked” if you need to monitor the quantity of the product in stock. This is crucial for physical goods where you must know current inventory levels to avoid stock outs or overstocking. Choose “Not Tracked” for services or products that don’t require stock management, simplifying your records and reducing unnecessary tracking.
The information you specify for any optional field will automatically appear when you select the product in documents like invoices and bills. However, you can still change any field for a specific transaction if the default doesn’t fit your needs.
In this section, you will explore the optional fields, which include
Item details
- Item Code: Enter a unique code or SKU for the product.
- Unit of Measure: Choose the unit that best represents how you sell or stock the product (e.g., kg, piece).
- Description: Add any additional description about the product.
Selling
- Selling Price: Set the default price for this item in sales invoices.
- Revenue Account: Select the correct sales account where revenue from this item will be recorded.
- Revenue Tax Rate: Choose the appropriate tax rate applied on sales of this product.
Purchasing
- Purchase Cost: Enter the typical cost price for this product which reflects on bills.
- Expense Account: Pick the right account to record the cost of goods sold for this product.
-
Purchase Tax Rate: Select the tax rate on purchases to ensure your accounting reflects the correct tax amounts.
If the unit of measure you want isn’t listed, just click on the “Unit of Measure” field, then click “Add Unit of Measure”. Enter your desired unit (like boxes or liters) and click “Save”.
The new unit will be automatically selected for this product and saved for future use, so you can easily pick it when adding any new product.
If you want to add attachments like a product photo or a PDF file, just click the “+” button next to “Add photos” and select a new file from your device or choose from previous uploads.
Once uploaded, it will be attached to the product details.
Items list overview
When you go to the items page from the main menu or after saving a new item, you will be directed to “Items list” where you can perform several actions such as:
- View Button Click here to switch to open the full item details in a focused screen for easier review and editing.
- Search Bar Use this to quickly find specific items by typing the name.
-
Action Buttons
- Add Filter: Narrow down the list by specific criteria to find what you need faster.
- Sort: You can sort data by date (for example, from oldest to newest or vice versa), alphabetically, or using various other sorting options based on your needs. You can also apply multiple sorting criteria simultaneously and easily rearrange the selected options by dragging and moving them, helping you present your data in a more organized and user-friendly way.
- Import: Upload items in bulk from a file to save time (You can find this option by tapping the three dots on the screen).
- Export: Download your items list for backup or external analysis (You can find this option by tapping the three dots on the screen).
Understanding key item list fields
the inventory-related fields, including:
-
Qty on hand:
This field reflects the current physical quantity of the item in stock and is updated automatically by the system whenever you create a bill, invoice, or other documents involving the item.
-
Avg unit cost:
This represents the weighted average cost of purchasing the item. If you buy the item multiple times at different prices, the system calculates this average to reflect the true cost per unit in your inventory.
-
Inventory value +/-:
This is the total value of the item stock you currently hold. It's calculated by multiplying the “Qty on hand” by the “Avg unit cost”.
- For example: if you have 50 units on hand and the average unit cost is $20, then the inventory value is 50 × $20 = $1,000.
-
Purchase cost:
This is the price you paid per unit when buying the item. It is directly related to the price you enter when setting up the item in the system, not the price from purchase invoices.
How to add warehouses and link them to inventory accounts
To add a new warehouse, click on “Products & Services” from the main menu then select “Warehouses” finally click on the “Add” button.
Enter the following warehouse details:
-
Code
Enter a unique code to identify the warehouse.
-
Name
Enter the warehouse name.
-
Phone
Add a contact number to facilitate communication related to the warehouse operations.
-
Address
Enter the detailed location and the postal code to ensure correct geographic identification.
After entering all the details, click the “Save” button.
Warehouse list overview
When you go to warehouses page from the main menu or after saving a new warehouse, you will be directed to warehouses list where you can perform several actions such as:
-
Viewing or editing a warehouse
Click on the warehouse name to open its details. From there, you can review the information or make updates as needed.
-
Deleting a warehouse
To delete a warehouse, click the delete icon next to it.
Warehouse Inventory Accounts
When you create a new warehouse, Wafeq automatically generates a dedicated inventory account for it under the Inventory section in the “Chart of accounts”. This account is used to track the value of items stored in that specific warehouse.
This automatic linking ensures that each warehouse’s inventory is tracked separately in your accounting reports, making it easier to manage and audit stock by location.
How transactions affect inventory and accounting in Wafeq
Once your inventory is set up with linked warehouses and accounts, every purchase or sale involving a tracked item will impact both your stock levels and accounting records. Understanding how these transactions work is essential for accurate inventory management and reliable financial reporting.
Receiving stock through purchase bills
To add quantity for a tracked item using a purchase bill, go to “Purchases” from the main menu, then select “Bills”, and click “Record” to enter the details. Once you select the item, you’ll notice that its default fields—like the purchase price, account, and tax—are automatically filled based on the item information and you can adjust them if needed.
When you're done, click “Save” to record the bill and update your inventory.
When you add a tracked item to a purchase bill, Wafeq requires you to select the warehouse where the item will be stored.
Once the bill is saved, the quantity is automatically added to that warehouse, and the inventory account linked to it is increased accordingly.
To check the quantity added as a result of the bill, go to the “Items list” under the “inventory” in the main menu.
You’ll find that the “Qty on hand” field has been updated automatically to include the quantity you just purchased.
If the product is “not tracked”, the quantity will not be reflected in inventory, even though it's saved in the bill.
Selling Items through Invoices
To reduce quantity for a tracked item using a sales invoice, go to “Sales” from the main menu, then select “Invoices”, and click “Create” to enter the details.
Once you select the item, you’ll notice that its default fields—like the price, account, and tax—are automatically filled based on the item information, and you can adjust them if needed.
At the same time, Wafeq automatically transfers the cost of the product from the warehouse inventory account to the Cost of Goods Sold (COGS) account, in accordance with the matching principle, which requires expenses to be recognized in the same period as the related revenues.
For tracked inventory items, the Cost of Goods Sold is calculated using the weighted average cost method (Average Cost).
When you're done, click “Save and send” to record the invoice and reduce the item quantity from inventory.
To check the quantity deducted as a result of the invoice, go to the “Items list” under the “Inventory” in the main menu.
You’ll find that the “Qty on hand” field has been automatically reduced by the quantity you just sold.
Cost of Goods Sold is not recorded
You may notice that the Cost of Goods Sold (COGS) does not appear when issuing a sales invoice.
This usually happens in the following cases:
The product does not have any previously recorded cost, either through purchase invoices or inventory adjustments. In this case, the system has no basis to calculate the cost.
The invoice is still in Draft status, which means it does not affect inventory quantities or accounting entries.
To ensure COGS is recorded correctly, make sure to:
Record a cost for the product through a purchase bill or an inventory adjustment before selling it.
Change the invoice status to "finalized".
Adjusting inventory manually: when and how to use inventory adjustments
Not all inventory changes happen through bills and invoices. Sometimes, you need to update your stock manually to reflect real-world changes.
- Adjustments are used to increase or decrease the quantity of tracked items manually.
- Typical use cases include correcting stock errors, handling damaged goods, or entering opening balances, etc.
- Inventory adjustments are often used after physical stocktaking to correct discrepancies between system records and actual inventory. This keeps your data accurate and audit-ready.
To add a manual adjustment, click on “Products & Services” from the main menu then choose “Inventory adjustments”, Scroll down to the blank row at the bottom of the list where you can enter the details directly.
Start filling the following fields:
- Reference: Add a reference code or number to help you identify this adjustment later.
- Date: When the adjustment should be recorded.
- Currency: Choose the currency in which the item’s value will be recorded.
- Warehouse: Choose the warehouse where the stock change applies.
- Item: Select the tracked item you want to adjust.
- Description: Use this field to provide context for the adjustment.
- Qty +/- : Enter how much to add (+) or subtract (−) from inventory.
- Inventory value +/- : Enter the total value of the quantity you're adjusting.
This amount reflects how much the stock is worth—whether you're adding it (as an asset) or removing it (as a loss).
If you're adding 100 units at 10 SAR each → enter 1,000 SAR.
If you're removing 50 damaged units originally worth 5 SAR each → enter –250 SAR.
If left 0.00, the quantity will update but won’t impact your financials.
Account: Pick the right account to reflect the reason for this change (e.g., Inventory Shrinkage , Inventory Opening Balance, etc.).
For example, you might:
Use an Inventory account when entering an opening balance.
Use an Expense account to record lost or damaged items.
Or choose another account that best reflects the reason for the adjustment.
Make sure the selected account aligns with the business purpose of the change—this helps keep both your stock levels and reports accurate.
Total adjustment amount: This field is automatically calculated based on the quantity you enter and the unit cost.
ID: This is the unique system-generated ID for this adjustment. You don’t need to fill it.
After filling all fields, press Enter or click away, and the system will automatically create the draft adjustment.
Only when the adjustment is marked as Posted does it become active—updating your inventory and generating the corresponding journal entry.
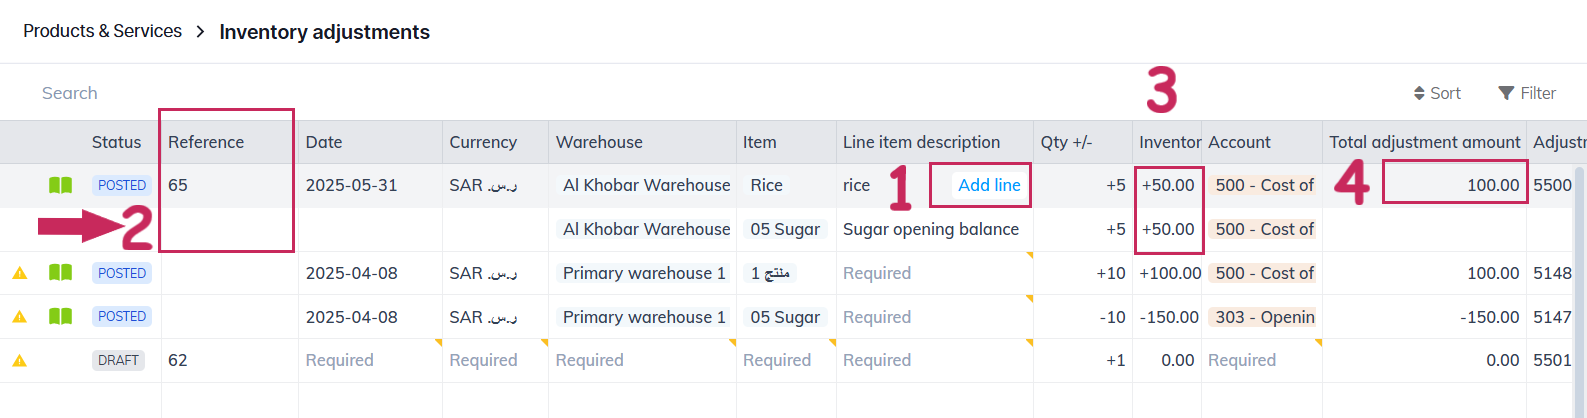
Adding multiple adjustments in one entry
To add multiple inventory adjustments in one entry, click “Add line” to add each item on a separate row. All rows will share the same Reference and will be posted together as one journal entry.
Each row has its own Inventory value, based on the quantity and unit cost you enter.
These values are then summed automatically into the Total adjustment amount, which reflects the full financial impact of the adjustment.
Use this approach when you're updating several items at once, like during physical counts or when setting opening balances.
How to Export Inventory Adjustments
To export "Inventory Adjustments" data, click on the three-dot menu located on the side of the screen, then select your preferred export format such as Excel or CSV. You can also save the data for future use or copy and paste it wherever needed.
Inventory reports overview
Wafeq offers three inventory reports to help you track product movement and monitor stock levels:
-
Inventory Movement
For more details, please refer to the guide.
-
Inventory Movement by Warehouse
-
Inventory Monthly Summary
For more details, please refer to the guide.
Each report opens with a summary view. Use these reports to understand stock trends, validate adjustments, and review warehouse performance.
To open any report, go to “Reports” in the main menu, then enter the report name.
You can search, filter, or export the data for deeper analysis or documentation.
Comments
0 comments
Please sign in to leave a comment.